Tech Stumps

  • Home
  • Android
  • iOS
  • Smartphones
  • Tablets
  • Tricks
Showing posts with label Tricks. Show all posts

How to Prevent your Computer from WannaCry Ransom Virus

in: Tech News Tips and Tricks Tricks
Securing your computer is not an easy job nowadays because so many types of viruses spreading daily on the internet world. We know already about basic viruses, malwares, adwares that defects your system and latest one threat is called as Ransom virus.  A massive Ransomware virus named “WannaCry” attacked over 2,00,000 computers across the world in many countries India, Asia, Europe and America.

How to Prevent your Computer from WannaCry Ransom Virus
 What is Ransomware Virus?

Ransomware is a type of malware that targets your computer files, documents such as word, excel, pdf and encrypts them with lock. So you cannot access your files anymore and even you can’t get the files after changing the extension. 

You have to pay some amount of dollars to the Ransom creator to unlock your files. The amount would be 300 dollars to 600 dollars and they will ask the amount in Bitcoin. But you cannot get guarantee of restoration of files even you paid the amount to them.
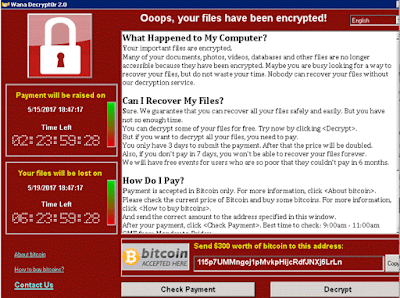
How to Prevent your Computer from WannaCry Ransom Virus


The latest WannaCry Ransom attacked so many computers in organizations, hospitals, banks and so on in US, UK, France, Germany and India.

See Also: Redmi 4 Smartphone Launched in India for Rs. 6999

How to Prevent WannaCry Ransom Virus?

Prevention is better than cure. So follow these steps to save your computer attacking from any Ransomwares and malwares. Mostly Ransomwares are spreading in the form of Email attachments. 

1.    Don’t click on any links and files on internet unless you know the link is safe
2.    Check twice from downloading email attachments. Check the sender is valid and trusted, sometimes the emails are sent to you professionally such as Invoices.
3.    Update your Windows 7, Windows 8 operating system and Install the security patch files. Keep your system up to date or simply upgrade to Windows 10. If you are using Windows 10 system then you are safe.
4.    Enable your Windows Firewall and block the unwanted ports.
5.    Keep the Antivirus software updated to latest version. Also you can check with Malwarebytes to remove malwares.
6.    Phishing mails – Don’t click on any links on the mail and check the link site is original
7.    Don’t download any Exe files in your email attachments.

How to Access WAP Sites on Firefox with User Agent Switcher

in: Firefox Internet Tricks WAP 2 Comments
WAP is the Wireless Application Protocol technology in Networks that is used to provide mobile contents in mobile browsers. Generally we can’t see the mobile WAP sites on Computer browsers because they can’t understand the Wireless Markup Language. I have met this problem on my Firefox browser when I want to download a movie for my mobile in a WAP site. Here I show you a simple trick to how to access WAP sites on Firefox with User Agent Switcher add-on.


What is User Agent? 

User Agent is a software agent that is working on behalf of a user for some works like browsing, mail reading on the network. For example, we use Outlook for reading emails is the Mail User Agent. We use Firefox for browsing is the Web User Agent. Generally browsers send requests to network with HTTP headers that contains User Agent string. So changing the Firefox User Agent to other mobile browser agent will work as the mobile browser.

 Install User Agent Switcher on Firefox 

Go to User Agent add-on website and click on Add to Firefox. After installing, restart your browser once. Then go to Tools menu -> Default User Agent
You will see the list of some browsers like IE, Search Robots and iPhone 3.0. If you want see the WAP content only, simply select the iPhone Agent. Then refresh the page once again, you will get the WAP site instantly on your firefox. If you want to browse the web pages in normal method, select the Default User Agent menu to revert back the settings.

You can switch through any user agents on anytime and you can add various types of user agents like Opera Mini, Skyfire, Bolt, Nokia s60. Click on Edit User Agents on the menu -> "New" button to add your favorite user agents. For this you have to get User Agent Strings of various browsers.
To get user agent strings for all browsers, crawlers, Email clients, consoles, Offline browsers, Feed readers and link checkers here. 

How to Find Free Flickr Photos on Yahoo Image Search

in: Flickr Internet Tricks Yahoo
Yahoo Search Engine has improved their image search support to find public Flickr photos also. Flickr is an online picture uploading and sharing site you know already, that has contains tens of millions of photos. Using Yahoo! Image search you can easily find photos from Flickr that are available for re-use or reposting under creative common license. Yahoo makes it easier than before to search photos and share on the web and mobile devices.

Using images on the website has a problem of copyright. A lot of photos found online have some copyright issues for their images. Without a proper permission, we do not post one’s images on our site. So we have to use our original images or free licensed photos provided by some websites. Flickr is such a useful website to find free licensed photos to reusing in our sites. With this integration of Flickr Photo search on Yahoo will be the good news to picture finders.

Steps to find free licensed Flickr Photos on Yahoo Search

1. Go to Yahoo! Image Search on the web or any other devices.
2. Search the images with any keyword and then all types of images listed in the search results.
3. If you want to get only free licensed photos that you can reuse, click on the link “Labeled for Reuse” filter on the left rail tab.
4. To know more about an Image: Just hover over the thumbnail to see the details about the photo, including the photographer’s name.
You can click the thumbnail to full view and attribution link shows about the creative common license. If you want to see that particular photographer’s album, just click on "i"  button in the full image view.

This feature available on Yahoo! Image Search across the web, tablets and mobile device.

XP Quick Fix Plus for 40 Common Windows XP Problems

in: Free Softwares Tricks Windows Windows XP 2 Comments
Maintaining a computer is not a easy process because computer owner have to face different types of problems everyday. Fixing windows problems is head ache to anybody, but this tool helps and recovers your Windows problems within seconds.For instance, Your system is attacked by virus and your Task Manager and Registry Editor is disabled by Virus. In that cases, you have to enable both tasks to fight against viruses. Some software installations make your system behavior to different or My computer or My documents folder opens on every start up.

XP Quick Fix Plus is a wonderful free tool from LeeluSoft, which fixes the 40 most common windows XP problems. It comes with a command line utility to fix 6 common problems directly from command line.In my experience, I had faced these problems some time and I searched lot of websites on Internet. For computer beginners, this is a must have tool for Windows XP systems.

With this software, you can control or solve some common windows settings listed below. You need not know the registry settings or command line settings to fix the problems. XP Quick fix Plus can solve your following windows problems and more with a single mouse click. In this tool, you can see the explanation of these problems to understand. This is a portable exe tool , you have to simply click the exe file to run and enjoy.

1. Enable Task Manager
2. Enable Registry editor
3. Stop My documents open at startup
4. Enable Folder options
5. Restore missing Run dialog
6. Enable CMD
7. Restore My Computer properties
8. Restore Device manager
9. Fix delay opening My Computer/Explorer
10. Restore Grayed Explorer and Taskbar toolbars
11. Restore My documents properties
12. Remove OEM splash and wallpaper
13. Restore My Network places to Desktop
14. Enable Recovery console
15. Restore Grayed File associations
16. Fix Right Click error
17. Fix slow network – File /Shared/Remote
18. Restore Network icon to System tray
19. Fix slow Hotkeys
20. CD /DVD drive is missing or not recognized
21. Fix CD Auto play
22. Restore “Send To” context menu items
23. Restore the Native Zip file integration
24. Fix Error 1606 – Could not access Network location
25. Error when trying to access Add or Remove programs

...and more 15 problems

Download XP Quick Fix Plus Tool

How to Change My Documents Location to Other Drive

in: Tricks Windows 2 Comments
In Windows systems, My Documents folder is important among other folders, which is generally used to save the users files. Whether it is a text file or pictures or the files you worked from various applications are saved to My documents folder default. Usually My documents folder is located on "C" drive of your windows system.

There is no problem of My documents folder on "C" drive except the following occasions. First one is due to size of the "C" Drive. Already it has windows installation files and lot of applications. If you store files frequently, there will be low space on that main drive. It may affect your windows to work properly.

Second one is security reasons. For instance your system has affected by viruses and malwares or your Windows OS have corrupted. In these situations, you need to reinstall or repair your windows OS. If you don’t have backup of My documents files already, that can’t be recovered and your data will be erased.

Now you may think change the destination of My documents drive to another one is safe and good thing. It can be done with following easy steps.

 1. Right click the My documents icon and select Properties (You can see My documents folder on Desktop or My computer)

 2. In the Target tab, you will see the current Location of the My documents folder. Click on "Move" Button and select your new destination like "D" drive or "E" drive or any of your system drives.

3. Finally Click on Apply button to move your files to new destination. You can revert this process by clicking Restore button. That’s all.

 Note: You have some free space on the new disk, more than old My documents folder’s size.

Download all your Tweets as archive from Twitter

in: Internet Tricks Twitter

Twitter introduced a new feature that you can download all of your tweets in Twitter website. If you think to save your twitter tweets to your local drive for some reasons, here is the good news to you. You can download all tweets and also retweets as archive. This will be useful when you want to see your past tweets. Here is the steps to download your tweets.

1.Login to your Twitter account.
2.Click on the Gear button that shown at the top right side. Then click on Settings menu.
3.In the Settings page, scroll down your mouse to the last section "Your Twitter Archive"
4.Click on the button "Request your Archive"

All done. Your request will be sent to the Twitter team and you have to wait some time. When your download archive is ready, they will send a email with your download link.

How to Merge All Excel Worksheets with RDBMerge Add-in

in: Excel MS-Office Softwares Tricks 5 Comments
Do you have so many of MS-Excel worksheets containing same format? If you want to merge all worksheets that containing same format data, you will do it by copy data in various sheets and then paste it on a single workbook. It’s very common and manual method when your number of files is low. Otherwise there are so many Excel files you have, what to do? So you will spend more time on it and you will take care of merging correct data.

How to Add Cover Photo to Twitter Profile?

in: Internet Tricks Twitter
Twitter released some new features including cover image for twitter profiles same as Facebook cover photos. Twitter adds this personality feature that called as Twitter Header Photo. So we can easily know people through their header photos.

This header image looks like a background image of your profiles, while your profile photo appears at center of the header image. When you send a tweet to others, header image will be appears inline. This can be viewed from any devices like iPhone, iPad and Android devices.

Personalize your Twitter Header

1. Sign in to your Twitter profile and click Gear button at top upper side.
 2. Click on Settings->Design
 3. Scroll down to “Customize your Own” and click on “Change Header”
 4. Now you can upload your image. You can zoom in/out your image to appropriate position and finally click to save changes. That’s it.
 Note:

 • Minimum width and height for image - 1252 x 626
 • Maximum Image file size – 5 MB

Facebook Keyboard Shortcut Keys

in: Facebook Internet Tricks

Facebook is the most using social networking site by worldwide users. If you are a Facebook user, keyboard shortcuts may help you to use Facebook quickly. And these Keyboard shortcut keys for Facebook saves your time and work without mouse.

Facebook Keyboard Shortcuts (Windows OS)


Function
Chrome/Opera/Safari
Firefox
IE
Search
Alt+?
Alt+Shift+?
Alt+?+Enter
New Message
Alt+M
Alt+Shift+M
Not Working
Go to Home
Alt+1
Alt+Shift+1
Alt+1+Enter
Go to Profile
Alt+2
Alt+Shift+2
Alt+2+Enter
Friend Requests
Alt+3
Alt+Shift+3
Alt+3+Enter
Open Messages
Alt+4
Alt+Shift+4
Alt+4+Enter
Notifications
Alt+5
Alt+Shift+5
Alt+5+Enter
My Account Page
Alt+6
Alt+Shift+6
Not Working
Privacy Settings
Alt+7
Alt+Shift+7
Not Working
Facebook page
Alt+8
Alt+Shift+8
Alt+8+Enter
Terms & Conditions
Alt+9
Alt+Shift+9
Alt+9+Enter
Facebook Help
Alt+0
Alt+Shift+0
Alt+0+Enter

Facebook Keyboard Shortcuts (Mac OS)


Function
Firefox
Other Browsers
Search
Function+Ctrl+?
Ctrl+Option+?
New Message
Function+Ctrl+M
Ctrl+Option+M
Go to Home
Function+Ctrl+1
Ctrl+Option+1
Go to Profile
Function+Ctrl+2
Ctrl+Option+2
Friend Requests
Function+Ctrl+3
Ctrl+Option+3
Open Messages
Function+Ctrl+4
Ctrl+Option+4
Notifications
Function+Ctrl+5
Ctrl+Option+5
My Account Page
Function+Ctrl+6
Ctrl+Option+6
Privacy Settings
Function+Ctrl+7
Ctrl+Option+7
Facebook page
Function+Ctrl+8
Ctrl+Option+8
Terms & Conditions
Function+Ctrl+9
Ctrl+Option+9
Facebook Help
Function+Ctrl+0
Ctrl+Option+0
 

How to Protect your Dropbox Account with 2-Step Verification?

in: Cloud Storage Internet Security Tricks 2 Comments

There are so many of hackers attacking sites daily. We have to protect our mail accounts and cloud based sites. Already you know about of Google’s 2-step verification process is a secure thing for using mails. Now famous cloud storage service Dropbox has also added this 2-step verification feature to all members. So you can secure your files online more effectively.

Disable Control Panel in Windows 7

in: Tricks Windows Windows 7 4 Comments

What is Control Panel?

Control panel has a set of functions to handle the operating system settings. We can set the date/time, remove programs, manage hardwares like display, keyboard, printers and changing many of the system settings. Control panel is a important part of a computer. If you are using a computer at home or office, some of your friends and anyone can change the settings and make problems to your system.
Older Posts Home
Get Updates in Email. Join with 500+ Readers
  • RSS Feed
  • Twitter
  • Google Plus

Popular Posts

  • Best Train Ticket Booking Reservation Sites
  • Facebook Keyboard Shortcut Keys
  • Get Box 50 GB Free Cloud Space for Lifetime
  • How to Backup Word files Automatically for Recovery
  • Get 512 GB Online Cloud Storage Free From BeeCloud
  • A Creative Wedding Invitation like Google Website
  • Viber Launched Desktop App with Video Calling for PC and Mac
  • Contact Us
  • Privacy Policy
  • Sitemap

"© Copyright 2011-16" TechStumps.com · All Rights Reserved ·