Tech Stumps

  • Home
  • Android
  • iOS
  • Smartphones
  • Tablets
  • Tricks
Showing posts with label Tips and Tricks. Show all posts

How to Prevent your Computer from WannaCry Ransom Virus

in: Tech News Tips and Tricks Tricks
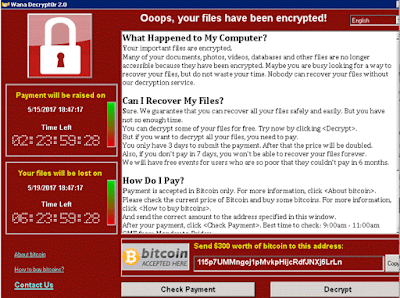
Securing your computer is not an easy job nowadays because so many types of viruses spreading daily on the internet world. We know already about basic viruses, malwares, adwares that defects your system and latest one threat is called as Ransom virus.  A massive Ransomware virus named “WannaCry” attacked over 2,00,000 computers across the world in many countries India, Asia, Europe and America.

How to Prevent your Computer from WannaCry Ransom Virus
 What is Ransomware Virus?

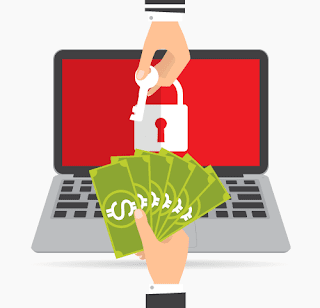
Ransomware is a type of malware that targets your computer files, documents such as word, excel, pdf and encrypts them with lock. So you cannot access your files anymore and even you can’t get the files after changing the extension. 

You have to pay some amount of dollars to the Ransom creator to unlock your files. The amount would be 300 dollars to 600 dollars and they will ask the amount in Bitcoin. But you cannot get guarantee of restoration of files even you paid the amount to them.

How to Prevent your Computer from WannaCry Ransom Virus


The latest WannaCry Ransom attacked so many computers in organizations, hospitals, banks and so on in US, UK, France, Germany and India.

See Also: Redmi 4 Smartphone Launched in India for Rs. 6999

How to Prevent WannaCry Ransom Virus?

Prevention is better than cure. So follow these steps to save your computer attacking from any Ransomwares and malwares. Mostly Ransomwares are spreading in the form of Email attachments. 

1.    Don’t click on any links and files on internet unless you know the link is safe
2.    Check twice from downloading email attachments. Check the sender is valid and trusted, sometimes the emails are sent to you professionally such as Invoices.
3.    Update your Windows 7, Windows 8 operating system and Install the security patch files. Keep your system up to date or simply upgrade to Windows 10. If you are using Windows 10 system then you are safe.
4.    Enable your Windows Firewall and block the unwanted ports.
5.    Keep the Antivirus software updated to latest version. Also you can check with Malwarebytes to remove malwares.
6.    Phishing mails – Don’t click on any links on the mail and check the link site is original
7.    Don’t download any Exe files in your email attachments.
Facebook Live Video Feature Now Available for Desktop

in: Facebook Tech News Tips and Tricks
Facebook has rolled out Live Video Streaming feature for desktop users. This feature was already available for only mobile users. Now Facebook allows users can start live video directly from your desktops and laptops.  So you can use live video streaming service from your PC with your webcam. Facebook added a new feature that makes it easy to use streaming software or external hardware when going live from a computer.
Facebook Live Video Feature Now Available for Desktop

Facebook Live feature was available only for Facebook Pages earlier, but now anyone in Facebook can make live video. In the Facebook home page you will see a live video button on your profile in your desktop. This is a easy procedure as like as posting a status on Facebook and the option is available along with Check In, Activities on the NewsFeed.

Also See : Oppo F3 Plus with 16MP+8MP Dual Selfie Cameras For Rs.30900

Also if you are a gamer, you will be able to stream your PC gameplay to your Facebook friends easily. Users can start live recording of game play, tutorials, how-to guides to their friends and followers. Users will be able to share their screens, switch cameras and they can select the option to broadcast videos to Facebook Groups, Events and Pages.
Facebook Live Video Feature Now Available for Desktop

How to Start Facebook Live Video on Desktop PC?

•    Just go to your Facebook Profile or Page
•    In the top of NewsFeed / Timeline you will see the option Live Video along with “Create a Post” section
•    Click on it and go live.

How to Download Microsoft Windows 10 Setup ISO Files?

in: Microsoft Tips and Tricks Windows 2 Comments
Microsoft finally released the Windows 10 operating system globally for public download. Windows 10 is now available as free upgrade for all the users those running Windows 7 or Windows 8 system. In case you are using genuine version of Windows 7 or 8 then you can upgrade for free to Windows 10 in the first year of release.

The update is rolling out gradually for all countries via Windows Update which will be notified in taskbar.But there are many people did not receive the update. Microsoft also provides an alternate way to download Windows 10 OS, so you can download directly ISO files via their Media Creation tool.

Also Read: Windows 10 Officially Released – How to Upgrade your System?

The tool allows users to easily download Windows 10 Setup ISO files. If you want to do clean install, you can create Installation media for another PC through bootable USB or DVD.

How to Download Windows 10 Setup ISO Files?

• Go to this Windows 10 ISO download page and select 32 bit or 64 bit version of Windows. Then you can download the Media creation tool to your system and run the tool.

• If you want directly upgrade your current system to Windows 10, click on “Upgrade this PC Now”

• Otherwise Click on “Create Installation Media for another PC” if you want to install on other computers or clean install.


• Then select the language and Windows 10 version. Make sure you download the correct edition if you have Home version of Windows 7 or 8 then download Windows 10 Home only.

• Choose which media to download – If you want to make bootable USB drive directly then select first option otherwise you can save ISO files to your computer. (USB drive should have at least 3 GB of free space)

• After the download you can burn the ISO files to a DVD to install on other computers. If you are performing a clean installation without upgrade you need to provide the Product key.

How to Save or Bookmark Links and Posts on Facebook to Read Later

in: Facebook Tips and Tricks
Do you confuse about your Facebook timeline with lot of posts and missing your favorite posts? Facebook has introduced a new feature called “Save” option that enables you to save links or bookmark your favorite posts for read it later. When you browsing the Facebook page you might find some useful posts or interesting links and you don’t have time to read it that time. So you can use Save that links and bookmark the posts on Facebook and read it later when you are free.

This Facebook Save feature allows you to save any kind of links, places, events, music and images from your news feed and you can read later on your mobile too. This feature is not only for desktop users and it is also supported in Android and IOS mobile apps.

 How to Save or Bookmark Links and Posts on Facebook to Read Later

How to Save Facebook Links for Read Later?

Browse through your Newsfeed and click the arrow mark on the top right side of your favorite post which you want to read it later. You can see the option “Save” with the name of the link. Click save option and the link will be saved on your newsfeed.

Read Also : Xiaomi Redmi 1S with 4.7-inch Smartphone Priced Rs.5999 [Sale on Flipkart from Sep 2]

How to Access Saved Content on Facebook.

You can see the new option “Saved” on your favorites menu below your Facebook profile name. All of your saved content is placed there and you can access them easily. The saved content is divided into few categories including links, places, movies, TV shows, books etc.

 How to Save or Bookmark Links and Posts on Facebook to Read Later


You can access specific type of posts easily and you can delete the posts by click on “X” button instantly. So this is useful tool to save your favorite and important links and posts from your friends.

How to Get Windows 8 Metro User Interface in Windows 7?

in: Free Softwares Freeware Tips and Tricks Windows 8
Windows 7 is the most popular operating system by Microsoft in these days, but Windows 8 is the latest version is also currently available to use. Windows 8 comes with many new features including Metro user interface, Charms Bar and other optimization features. Metro UI is the beautiful new customizable grid layout of apps that provides a new look and you can open apps faster.
Winmetro - Get Windows 8 Metro screen in Windows 7
Do you want Metro UI in your Windows 7 system? You don’t need to migrating from Windows 7 system to Windows 8. We can simply bring the Metro UI in Windows 7 desktop with the help of third party software. There is an app called WinMetro developed by IoBit Company, popularly known for Iobit Advanced System Care software.

Winmetro - Get Windows 8 Metro screen in Windows 7

WinMetro is a light weight software that turns your desktop to Metro user interface and displaying useful information such as weather, calendar, news, stocks and more. It simply brings the Metro screen and settings window of Windows 8 system by pressing the Win+I buttons. You can shut down, sleep, log off and Restart your PC easily from Metro screen.

Also Read: Microsoft Released Office for iPad with Word, Excel and Powerpoint

Winmetro - Get Windows 8 Metro screen in Windows 7

The settings are very simple and it offers the option to boot to Metro Start screen directly. It works with Windows XP/Vista and Windows 7 systems.

Download WinMetro

How to Change Folder Colors in Windows using Rainbow Folders

in: Freeware Softwares Tips and Tricks Windows
In Windows we can distinguish the folders by changing its name, sorting or changing folder icons. But the folder color always in yellow color, we cannot change that and it makes the difficulty to finding a particular folder. Do you want to organize your windows folders with a different color? There is a solution available for this problem called Rainbow Folders.

How to Change Folder Colors in Windows using Rainbow Folders

Rainbow Folders helps you to change colors of your desired folder anywhere in Windows system. It supports different icon styles including classical, typical and modern. You can set the colors by adjusting hue and saturation bars. You can also change the color of multiple folders by selecting the Multiple select button. After your selection, click on "Colorize" button to color the folders or if you want to remove color, click on "Decolorize" button to remove color on folders.

Read Also: TimePIN for Android – Change Your Lockscreen PIN Based on Current Time

How to Change Folder Colors in Windows using Rainbow Folders

Download the file and extract it first and install the software. Then you can access this software from right click of the folders from the explorer window. Rainbow Folders is a very useful, and easy to use software to color your folders in Windows.

Download Rainbow Folders

TimePIN for Android – Change Your Lockscreen PIN Based on Current Time

in: Android Android Apps Tips and Tricks
Android smartphones are getting so popular now and it became the major operating system in the world. We have to protect our data in mobiles from unwanted persons and we must secure the mobiles from being stolen or lost to someone. There are many lock types can be used in Android mobiles including pin lock, pattern lock, and slide lock and more.

There are so many lock screen and password apps available now but we have to see an innovant application that provides better security than any other apps. TimePIN is an Android app that sets your lockscreen PIN code to the current time. It is different from other lock screen applications because it changes the password for every minute based on the time of your phone.
TimePIN for Android – Change Your Lockscreen PIN Based on Current Time
TimePIN for Android features:

* A better and safe password for every minute
* No need to remember complicated passwords
* Don’t worry to enter your password when your friends are watching that.
* Default PIN can be used when your phone locked out and restart.

Read Also: Get Ubuntu Touch Lockscreen for Android Smartphones

For instance If your device time is 05:35, your password becomes 0535, or if you are using 24 hour format and the current time is 21:45, then you have to enter the password as 2145. There are many modifiers to morph the PIN everytime, to enhance the security and difficult to guess the password.
TimePIN for Android – Change Your Lockscreen PIN Based on Current Time
1. Reverse - It reverses the PIN. If the time is 11:24, your PIN will be 4211
2. Mirror - It mirrors the PIN. If the time is 8:34, your PIN will be 08344380
3. Double – It Doubles the PIN. If the time is 12:34, your PIN will be 12341234
4. Offset - It generates the password based on time and subtracts that with a particular number that already chosen by you. If the time is 10:43, and your offset is -121, your PIN will be 0922.

Read Also: Micromax Funbook P280 Budget Android 4.2 Tablet Launched for Rs.4650

TimePIN is available for free to download but you can use reverse modifier only in free version. If you need more modifiers, you can buy this app for $1.99 with in-app purchase. The developer announced more features including pattern passwords, alphanumeric passwords will be coming soon.

Download TimePIN for Android

DLD Calc – Android app to Get Step-By-Step Math Fraction Calculations

in: Android Android Apps Tips and Tricks
Mathematics is always difficult subject for many students and they get struggling with formulas and seeking help from teachers or friends. Nowadays there are many apps that help you to get the answers for difficult mathematical problems. DLD Calc is a fraction calculator app for Android mobiles that solves any fraction problems. It will simplifies fractions in step-by-step calculations in the best possible way so the students can verify their problems with each steps.

DLD Calc Math Fraction Calculator app for Android
DLD calc looks like a simple calculator with common buttons and it differs from a standard calculator, because it will shows entire calculation with simplest steps. It's main feature is resolve fractions by steps simplifying and visualizing the operation in a practice and simple way never seen before. You can do all basic arithmetic calculations or complex fractions. After the typing of your problem, simply press equal button and you will get the answers in a separate page.

DLD Calc Math Fraction Calculator app for Android
Read Also: Motorolo Launched Moto G Android Smartphone in India for Rs.12499 

DLD Calc for Android Featurs:

  • Solve complex large fractions operations in steps. 
  • Simplifying the Fractions. 
  • Basic mathematics, Fraction addition, subtraction, multiplication and division. 
  • Least common denominator. 
  • Greatest common divisor. 
  • It breaks the mathematical restrictions between complex calculus and its decimal numeric solution. 
  • It's not just another scientific calculator with algebraic and trigonometric operations, but an advanced integer fractions calculator. 
  • You can use it to solve your mathematics problems in your school. 
  • The interface is very simple and easy to use in your phone or tablet.  

The app is great for students and teachers also, it is available for free and you can download from Google Play.

Download DLD Calc for Android

How to Convert Word Files to PDF in Android?

in: Android Android Apps MS-Office Tips and Tricks
Android is the most popular mobile operating system now and it grows with millions of apps, games, books and more. Some Android devices do not provide the feature of office suite to view or read MS-Word documents. So you cannot read doc or docx files within Android, you need to find alter way to do this.
You can read Word documents by converting them to PDF files. PDF is the best and universal format that can be used in various devices. After the conversion you can view the document from Adobe Reader or any PDF readers for Android. First you need a Converter app for Android, so you can download Word to PDF converter app developed by Thinkti.com.br website.

Free Word to PDF converter app for Android
The app starts with Select File button, you just click on it and select any Word file. Then click the convert button to upload the file and convert the file online. Converting time will be depending on your file size. After a few seconds you can download your converted file easily.

Free Word to PDF converter app for Android

Also Read: Get Indian Mobile Recharge Plans Offers with iReff Android App 

Word to PDF Features:

  • Convert doc, docx, odt, rtf, ott files to PDF easily
  • Perfect support conversion from DOCX.
  • Best conversion from DOC, read images, graphs, tables, etc.
  • Share converted files instantly through Bluetooth and Email.
  • Set passwords for PDF files
  • It works online but does not store or use any personal data.

Word to PDF app available for free to download on Google Play. It comes with ads and you can purchase the ad-free version if you need. Also the developer offers more variety of apps including Excel to PDF, Powerpoint to PDF, Word to TXT, Excel to HTML, Powerpoint to Flash and more. You can see these apps under the download page.

Download Word to PDF for Android

Get Indian Mobile Recharge Plans Offers with iReff Android App

in: Android Android Apps Tips and Tricks
Mobile usage is increased in these days and there are many network operators providing different services and offers to customers. Also the providers giving daily based special offers and recharge plans but you can get the details only by contacting dealers or sending SMS. Before you recharge your prepaid mobile, you have to find the most appropriate recharge plan for your exact need.

iReff app is the quickest and easiest way to get the latest recharge plan and offer information. iReff is an Android app that helps you to easily know your Topup Vouchers, Special Tariff Vouchers (STV), Combo Vouchers and Full Talk Time offers. The app has very simple interface, initially you have to select your mobile operator and your telecom circle.

Get Indian Mobile Recharge Plans Offers with iReff Android App

The app will shows list of all topup plans and tariffs of other services. If you click a particular recharge amount, you will get the recharge plan details with additional information such as talktime, price, updated time, source and USSD string to activate it.

Get Indian Mobile Recharge Plans Offers with iReff Android App

Also Read: Micromax & MTS Launched Canvas Blaze Dual SIM (CDMA+GSM) Smartphone for Rs.10999
 
iReff app for Android Features:

  • It provides recharge details with different sections such as Topup, SMS, 2G Data, 3G Data, Local, STD and more.
  • iReff updates the recharge plans daily from the particular operator’s website.
  • It supports 14 prepaid mobile operators and 22 telecom circles.
  • A dedicated search box to search recharge plans based on particular price range.
  • You can also get the recharge plans and offers by sending SMS. Check the official site to know SMS commads.

iReff app for Android is available free to download on Google Play. The app is currently in beta stage and it comes with ads, there is no pro version for this app.

Download iReff app for Android

Manage Multiple Cloud Accounts at one place with MultCloud

in: Cloud Storage Tips and Tricks Websites
There are lot of cloud storage services available online such as Google Drive, SkyDrive, Dropbox, Box, MediaFire and many more.Cloud services are important for computer users because you can save all of your files online securely and access from anywhere and any device like laptop, PC, mobiles and tablets. All of these services provide free online cloud storage for all users and also you can buy extra space for particular amount.

Manage Multiple Cloud Accounts at one place with MultCloud

Sometimes you have more than one cloud account for many purposes, and also some services provide limited storage only for free users. So you have to login separately for each services, it will be some annoying process and you think about single interface for all of your cloud accounts. There is an online solution named MultCloud that allows you to connect and access all the cloud services at one place. It works like centralized management tool for all cloud drives, so you can view and organize files easily for many accounts.

Manage Multiple Cloud Accounts at one place with MultCloud

Read Also: MediaFire Released Official Desktop Client for Windows and Mac

MultCloud Features:

  • Download and upload files to many cloud accounts at one place.
  • You can set permissions for files and share files to friends
  • Add multiple accounts for same cloud service [If you have two accounts in Google Drive]
  • Transfer files from one service to another service. You can cut, copy, paste, delete any files from one to many services.
  • Open and view files including image files, doc, txt, pdf, xls, ppt and etc.
  • Search files across all various clouds.
  • Transfer you data using 256 bit AES encryption for secure connection
  • It supports all popular cloud services including Google Drive, SkyDrive, Dropbox, Box, Amazon Cloud and more.
How to use MultCloud to access multiple cloud services?

1. First you have to create a new account in MultCloud online and sign-in
2. After sign-in, you will see the main interface that showing all cloud account services
3. Click on “Add Cloud Drive” button to add your cloud service. Already you have some cloud storage account in any service like Dropbox, Google Drive. If you don’t have any account, you can sign-up for one.
Manage Multiple Cloud Accounts at one place with MultCloud

4. That’s it. Now you can access various cloud accounts with one login. Enjoy :-)

MultCloud

Convert Audios and Videos on Android with Format Factory

in: Android Android Apps Freeware Tips and Tricks
Format Factory is one of the popular software for converting audio and video files in windows. It can converts your audio files from one media format to other supported formats and one video format to another video formats. Format Factory is now available for Android devices, so you can convert any media files or movies within your Android phone.

Convert Audios and Videos on Android with Format Factory

How to Convert Audio & Video Files in Android?

The process is very simple. You have to click on the “+” symbol on the top right and select your file type whether audio or video. Then you can select the custom presets for quick conversions or you can modify the entire conversion settings.

Convert Audios and Videos on Android with Format Factory

For Video, you can change the video quality, resolution, aspect, bitrate and more. For Audio, you can change the codec, frequency, channel, bitrate and more. After you have done the settings, finally click on the convert icon at the bottom of the app. That’s all.

Read Also: Download Official Instagram Beta App for Windows Phone 8

Format Factory is a simple and free video converter for Android phones and tablets. The video formats supported are flv, mp4, avi, wmv and more. It supports mp3, aac,flac and mp2 formats for audio files. There is no support to convert a video to audio file. Otherwise it is the best video converter within Android, you can do the work without desktop computer.

Download Format Factory for Android

Gmail adds Quick Action buttons for Dropbox, Docs, YouTube and more

in: Gmail Google Tips and Tricks
Google has updated Quick Action buttons for Gmail with more new actions which was launched earlier in this year. Quick Action buttons lets you perform some actions without opening a particular mail, so you can open a link or check a flight details from the subject line. Now web users can access even more quick action buttons in Gmail.

New Gmail Quick Action buttons: 

The Quick Action button will be placed on the right side of the emails. Other site actions included with an arrow button that lets you go directly to a page linked to in the message.
Gmail adds Quick Action buttons for Dropbox, Docs, YouTube and more
Read Also: Download RedBus App for Book Bus Tickets from Mobiles 

  • Users can rate and review restaurants on Seamless and view your OpenTable reservations. Also you can modify your dinner reservations from the inbox. You can do this action quickly by Review button. Not only the restaurants, you will review goods, movies, music or any other products. 
  • Save promotions or offers from Google Offers with one click 
  • You can directly open files and documents from Dropbox, Google docs, sheets and slides from your inbox which shared via your email. 
  • Video uploaders can directly view the videos from YouTube and Vimeo when new video uploads finished 
Gmail adds Quick Action buttons for Dropbox, Docs, YouTube and more

Gmail now supports a variety of actions and the action buttons can be determined by the sender. The sender will select one of those action types and provide information to set it up correctly. Google is continuing to add even more quick action buttons to use Gmail easier, so Facebook, Twitter and other services will be connected on this feature soon.

How to Get Custom URL for your Google Plus Profiles / Pages

in: Google Google+ Social Media Tips and Tricks 2 Comments
Google rolled out custom URL (vanity URL) feature to Google Plus profiles and pages. Google Plus profiles have long numbers in URLs, which is hard to remember and sharing with others. Before this feature only available for famous people, Google employees and other special users. So all of the users were used third party services like GPlus.to to shorten their page URLs. Now anyone can get short and custom URL for your pages and profiles too.

How to Get Custom URL for your Google Plus Profile? 

Your profile must have a photo, minimum 10 followers and your account age is more than 30 days. These are the requirements for setting a custom URL for your Google+ profile.

1. Go to About tab of your profile and you will see the message “Your profile is preapproved for the custom URL: google.com/+PonmalarS” on top of the page. Alternatively you can get it from Links section. Click on “Get URL” button.

How to Change Custom URL for your Google Plus Profiles / Pages
 
2. Tick the checkbox near “I agree to the terms of service” on the next window. If you don’t want the pre-assigned URL by Google, you can change your URL name by click on the link “Request a different one” [Google providing this based on your first and last name]

How to get Custom URL for your Google Plus Profiles / Pages

3. Click on Change URL and Confirm Choice buttons. Now I got phone verification code in my Phone and entered the code to verify this process. I think that happened because of using two-way security for my Google account.

How to get Custom URL for your Google Plus Profiles / Pages

After verifying process, I got my Google+ profile custom URL : google.com/+PonmalarS. I was tried to simplify my name, but I can’t get one. So hurry up and get your Custom URL before anyone claims it.

How to Get Custom URL for Google+ Pages? 

Your page should have linked with with your website or blog. So add your site link in your Google+ Page and add a badge to your site. Google is providing pre-assigned Custom URLs based on the site’s URL, so blogspot users may get the URL ending with “Blogspot”. And you cannot change this later. If you don’t want this URL, you have to wait for some time for more options.

Read: How to Create Google+ Pages

1. Go to your Google+ page and make sure you are using Google+ as your page.

2. You can see the message “Your page is preapproved for the custom URL: google.com/+Techstumps” on the top of the page.

How to get Custom URL for your Google Plus Profiles / Pages

3. Click on “Get URL” button and tick the checkbox near “I agree to the terms of service” on the next window.
How to get Custom URL for your Google Plus Profiles / Pages

4. Click on “Change URL” and “Confirm Choice” buttons. That’s it.

My site got the Custom URL: google.com/+Techstumps. If you don’t see the above message yet, don’t worry. Google is rolling out this feature for all users within this week.

More Google+ Tips:

1. How to Automatically Share Blogger Posts to Google Plus
2. How to Embed Google+ posts to your Website
3. How to Add Google+ Comment Box System to Blogger Blogs
4. How to Tag your Google+ Friends on Blogger posts
5. How to Create Google Plus Badge for your Blog?

How to Automatically Share Blogger Posts to Google Plus

in: Blogger Blogger Tips Google+ Tips and Tricks
Every blogger should share their posts to get traffic from social networking sites like Google+, Facebook and Twitter. Sharing your content on many sites may take some time and there is no way to share posts automatically. We can do with some web tools like Dlvr.it to share posts automatically on the web. Now Blogger introduced a new feature that allows you to share blog posts automatically to Google+.

With this feature your blog posts will be shared automatically on Google Plus when you publish the new post. You can choose your Google Plus profile or Page and this process does not require any additional clicks. Also if you have enabled Google+ comments, any replies and comments on Google+ will also display on your blog.

Before you go: 

This new feature will be available only for all those who connected a Google+ page or profile to their blog. If you have not enabled Google+ profile, click on “Blogger Dashboard -> Google+ tab -> Get Started -> Switch Now”. Now your blogger profile will be changed to Google+ profile.

How to Enable Google+ Automatic Sharing for Blogger

• Go to your Blogger dashboard and select your blog
• Click on the Google+ tab on the left panel.

How to Share Blog Posts Automatically to Google+

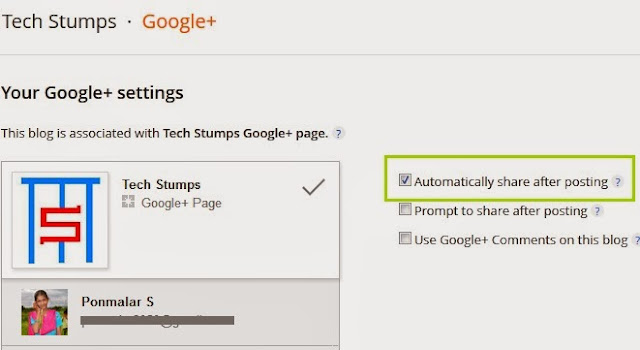
• You will see your Google+ profile and pages. Choose where your posts will be shared automatically.
• Tick the check box on “Automatically share after posting”. That’s it.

If you don’t like this automatic sharing feature, you can disable by tick the check box “Prompt to share after posting”. This feature will start working the next time you publish the post.

Blogger's Default Comment Form Redesigned with New Look

in: Blogger Blogging Google Tips and Tricks 2 Comments
Blogger is the most popular blogging platform has redesigned its default comment form with new look and more simple. Blogger did not announced about this change officially on the web and I noticed this change in my blog today. It is automatically rolled out for Blogger blogs so you need not change anything in code or settings.

Here is the screenshot of Blogger Comment Form old:

Blogger's default comment box old
And here is the changed Blogger comment box new:

The new comment box for blogs updated with new design including Publish button, Preview button, Sign out button and Notify me option. “Notify me” option lets you to get comment updates and replies to your mail directly.

Blogger's new comment box

Here is the Comment Preview screenshot: 

Blogger's new comment box
There are many comment systems available for webmasters such as Disqus and Facebook comments, so Google also released Google+ comments for blogs and sites. However now blogger has also better comment form, so the bloggers reconsider to switch back to Blogger comments. And we can use Blogger comments and Google+ comments simultaneously.

Which comment system are you using now? Share your comments below.

Read : How to Add Google+ Comment Box to your Blogs

How to Embed Google+ posts to your Website

in: Google Google+ Tips and Tricks
Google introduced two new features in Google+, one is Embed your posts and another is Author Attribution for Wordpress users. Now the site owners and bloggers can embed your Google+ posts or any public posts to anywhere on the web. So you can expand your audience across the web easily with embedding your Google+ shares on your blog.

Google+ posts can be embedded as a primary source or highlight your point of view in your articles. This feature allows you to embed Google+ posts including links, images and videos with follow button, +1 button and comments. Embedded posts can be seen by anyone there is no need of Google account.

How to add your Google+ posts to your Blog?

• Select your post or search public posts in Google Plus
• Click the options menu button at right of your specific post

How to Embed Google+ posts to your Website
• Choose Embed post in the drop down menu
• You will get an iframe window that contains code to embed the posts. • Copy the code and paste to your blog / site.

Note: Users can embed all type of public posts except the posts from within a community, restricted posts to a Google Apps domain, private posts, Events and Google+ Hangouts on Air posts.

Look below the live example of Google+ posts: ( You can follow me, +1 or comment here also )

Get Ubuntu Touch Lockscreen for Android Smartphones

in: Android Android Apps Tips and Tricks Ubuntu
Ubuntu is the popular operating system and it’s available as Ubuntu Touch OS for smartphones. It has a lot of personalize options and new lockscreen with animations. The Ubuntu Touch Lockscreen is now available for Android smartphones which gives a new look and replaces your default lockscreen.

Ubuntu Touch Lockscreen is a simple, elegant and fast custom lockscreen that displays the notifications in a circle design with beautiful animations. With this app you can get message and call notifications within the ring design and you can control music playback options. There you can play or stop the music and move previous or next song within your lockscreen.

Ubuntu Touch Lockscreen for Android Smartphones

There are more customization options available in this app such as lock timer, enable or disable the animations and changing animation time. You can change the color of the circle for notification and run the lockscreen in full screen mode. You can set the password in security settings and you will enter the password when you unlock the phone.

Ubuntu Touch Lockscreen for Android Smartphones

It is developed by XDA senior member Rotary Heart and the app is available in beta version on Google Play Store.

Ubuntu Touch Lockscreen for Android 

How to Import Google Reader data to Digg Reader

in: Google Social Media Tips and Tricks
Google Reader is officially stopped recently so we have to go for alternative readers to read our favorite stories on the web. Fortunately the other readers provide the support for import your Google Reader data to build your favorite list of sites and starred items. Google only allows downloading your data until July 15, so you have to export your data from Google Takeout. 

After the exporting your data, you can import the all old items into your alternative feed readers like Feedly, Digg Reader and more. Digg Reader is developed by Digg social news site and it is becoming one of the popular readers now. Here are the steps to import your Google Reader feeds into Digg Reader.

Import Google Reader data to Digg Reader

How to Upload Google Reader Data to Digg Reader?

1. First download your Google Reader Data from Google Takeout

2. Sign in to your Digg Reader Account. If you do not have one, you can simply create through your Facebook, Twitter or Google accounts.

3. Click on the top right icon to view the settings. In the Digg Reader section, click the “Upload” button.
Import Google Reader data to Digg Reader

4. Click on “Upload your data” button and then select your downloaded zip archive file of Google Reader data. Digg Reader also supports importing OPML XML files, which most readers services will export.
Import Google Reader data to Digg Reader

After the import process completes, you will see and access all of your old Google Reader subscriptions including your starred items from the saved section.

Simple Way to Add Instagram Videos on your Blog / Website

in: Blogger Tips Blogging Freeware Tips and Tricks
Instagram is a popular online photo and video sharing application that helps users to take photos or videos and share them online instantly. Instagram application is acquired by Facebook and it is available for Andorid and iOS devices. Recently Facebook has introduced the video sharing feature in Instagram that allows you to capture and share videos up to 15 seconds like as Twitter’s Vine application.

Do you want to embed or insert your Instagram videos on your blog or website? Here is a simple tool available online to add Instagram videos and the tool is originally developed by the popular blogger Amit Agarwal from Labnol. Now the bloggers or webmasters can add Instagram videos on their site easily.

How to Add Instagram Videos on your Site?

1. Go to Embed Instagram online tool.

2. Give your URL of the Instagram video that you want to embed.

Simple Way to Add Instagram Videos on your Blog / Website

3. Click on “Generate Embed Code” button to generate the code

Simple Way to Add Instagram Videos on your Blog / Website

4. Then copy the code shown on the page and paste wherever you want.

If you want to use Instagram videos on blogger posts, you have to paste the code by clicking "HTML” section of the post editor. That’s all.
Older Posts Home
Get Updates in Email. Join with 500+ Readers
  • RSS Feed
  • Twitter
  • Google Plus

Popular Posts

  • Contact Us
  • Privacy Policy
  • Sitemap

"© Copyright 2011-16" TechStumps.com · All Rights Reserved ·